![]()
![]()
Embossing effects using image channels
- Software: Canvas 5
- Platform: Mac OS and Windows
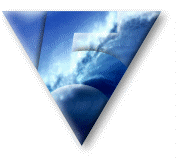
To create an effect like the one seen in the image of the Canvas 5 logo superimposed on the ocean, we make use of image channels. Channels are used to select pixels in an image, but unlike tools (such as the Marquee) that make selections based on shape, a channel lets you make selections based on the lightness values of a grayscale image contained in the channel. Working with channels is an effective way of creating beautiful composite images.
The final image |
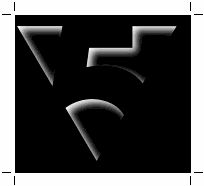
The Canvas 5 logo is three vector objects, with the numeral "5" formed in the negative space between the objects. For this procedure, an image object wouldn't have worked the same way, because the center must be hollow, not white. We made the logo by applying the Combine command, using the Punch option, to two objects: a white 5 and a black triangle. We also made a solid black vector triangle to mask the ocean image.
|
Pasting the logo to make an image channel. |
Copying the logo into a channel We select the logo objects and choose Copy in the Edit menu. We double click the ocean image to go into editing mode, then choose Paste in the Edit menu to make the logo a floating selection in the ocean image. To open the Image Channels palette, we choose Show Channels in the Image menu. In the Image Channels dialog box, we click the dashed circle button at the bottom of the palette to make a channel containing the logo. We press delete to remove the logo from the ocean image (it's a floating selection, so this doesn't affect the channel). We then press ESC once to leave editing mode. Now, we select the solid triangle vector object. We choose Copy again, then double-click the ocean image, choose Paste, and click the Make Channel button in the Image Channels palette. Another new channel, containing the triangle image, appears. We press Delete to remove the triangle from the ocean image (again, without affecting the new channel). To avoid confusion, we rename the new channels. To name a channel, double-click it, type a name in the Channel Options dialog box and click OK. We name the first channel (with the 5 logo) "Logo with Triangle" and name the second channel "Triangle." |
To make a highlight channel, we use the Calculate command. |
Making selection masks for highlights and shadows We duplicate the "Logo with triangle" channel by selecting it and choosing Duplicate Channel in the pop-up menu at the bottom-right corner of the palette. We name the new channel "Blurred Channel." We blur the image in this channel by choosing Filter > Blur > Gaussian Blur in the Image menu and specifying a blur radius of 3 pixels. The amount of blur needed depends on the image resolution; the Preview option can help you decide. To create the highlight and shadows, we use the difference between the solid logo channel and the blurred one. We offset the blurred channel first in one direction and then the other direction, and calculate the difference between the sharp and blurred channels after each move. In this way, we make new channels for selecting the highlight and shadow areas. We choose Filter > Other > Offset in the Image menu, and set the Horizontal and Vertical values to 4 pixels. This will offset the image 4 pixels down and to the right. We select the "Repeat Edge Pixels" option and click OK. We choose Calculate in the Image menu. We select "Logo with Triangle" for Source 1 and "Blurred Channel" for Source 2 with the Invert option. Under Blending, we choose Multiply and set Opacity to 100. For Result, we select New and then click OK. We name this the "Highlight" channel. To make a shadow channel, we select the "Blurred Channel" again, choose Filter > Other > Offset, and this time use -8 for Horizontal and Vertical values. This moves the image 4 pixels up and to the left from its original location. We choose the Calculate command again, select "Logo with triangle" for Source 1 and "Blurred Channel" for Source 2 with the Invert option. We select Multiply for the Blending method, set Opacity to 100, and click OK to create the "Shadow" channel. |
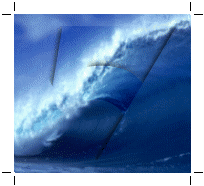
The shadow applied to the image. |
Putting it all together Now, we select the composite (RGB) channel. We load the "Logo with Triangle" channel as a selection by dragging the channel to the Make Selection (dashed circle) button at the bottom of the palette. The channel selects the pixels in the main image that correspond to the white pixels in the channel image. In this case, we actually want to select the opposite area, so now we choose Select > Inverse in the Image menu. To darken up the selected area so the logo begins to emerge from the ocean, we choose Adjust > Levels in the Image menu. In the Levels dialog box, we move the top black slider to the right, setting the first Input Levels value to 30. To create the highlight on the embossed image, we load the "Highlight" channel as a selection (by dragging the channel to the Make Selection [dashed circle] button at the buttom of the palette) and then choose Filter > Other > Fill. We select White in the pop-up menu, set Opacity to 80%, select Normal mode, and click OK. To make the shadows, we repeat the steps above, but this time we load the "Shadow" channel and select Black in the Use pop-up menu in the Fill dialog box. |
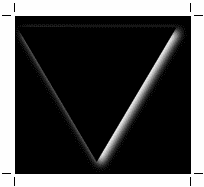
The "Drop Shadow" channel. |
Cutting out the triangle and making a drop shadow To finish the image, we load the "Triangle" channel, choose Select > Inverse, and press Delete to erase the selected area to white. This stamps the triangle out of the ocean image. To create a soft shadow under the triangle, we duplicate the "Triangle" channel and name the copy "Blurred Triangle." With this channel selected, we choose Filter > Other > Offset. We enter 4 for the Vertical and Horizontal values and click OK. Then we choose Filter > Blur > Gaussian Blur, enter 3 pixels, and click OK to blur the channel image. We choose the Calculate command, select "Blurred Triangle" for Source 1, "Triangle" for Source 2 with the Invert option selected, set the Blending method to Multiply, and select New for the Result option, and then click OK. This creates a new channel that we name "Drop Shadow." Finally, we select the composite channel and load the "Drop Shadow" channel as a selection. We choose Filter > Other > Fill. We select Black to fill the drop shadow area at 60% Opacity and click OK. Now the completed image has a soft drop shadow to go with the logo embossed into the waves. |


![]()
| About | News | Products | Purchase | Support | International | Prepress | Gallery | Register | Send E-Mail | Map | Home | |
| Copyright © 1997 Deneba Systems Incorporated All rights reserved worldwide Legal | |